Wednesday, March 7, 2012

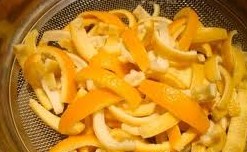
Drying Orange and Lemon peels......


How to Dry Orange or Lemon Peel at Home: It's quite easy.

Prep Time: 30 minutes

Cook Time: 30 minutes

Total Time: 1 hour

Ingredients:

  • Orange peels or lemon peels

Preparation:

 Take a number of organically grown oranges or lemons (which should have untreated, pesticide-free skins), and use a fine-bladed paring knife to trim away just the colored part of the skin, leaving the bitter white part behind. Lay the strips skin-side down on a plate and let them dry at room temperature for 3-4 days, until they have shriveled and are no longer moist. Store the dried peel in a dark place, in a clean jar. To use, either crumble it or whirl it in a blender. You can use the powdered peel in place of extract in baking; in toppings, to flavor sugar-bowl sugar, in spice mixes (e.g. lemon, pepper, rosemary and sage as a barbecue rub), and to flavor sauces of one kind and another.

Lemon Zest and Drying grated lemon or orange peel

Lemon Zest -


The rich outermost part of the rind of an orange, lemon, or other citrus fruit, which can be used as flavoring.

On a lemon, it is the yellow part of the peel (skin) on the outside of a lemon. The zest is shiny, brightly colored, and textured; it is the outer surface of the fruit which consumers can directly see.

The peel of a citrus fruit contains two (2) top layers; the zest (the outermost part of the rind), and the pith (a white, fibrous membrane directly below the zest which helps to protect the fruit inside).

Lemon zest has an intense lemon/citrus flavor with very little bitterness. The bitterness is primarily found in the white part of the lemon (the white pith). The white pith will give your dish a bitter undertaste. Carefully zest your citrus fruits leaving the pith on the fruit.

Before zesting, scrub the fruit with a sponge and warm, soapy water. Rinse it well and dry it with a paper towel.

Zesting a lemon

Lemon Zest


Drying your own.....


Grated lemon or orange peel is often called for in fruit bread and quick bread recipes. The peel, or rind, gives the bread an incredible citrus flavor that can't be found in artificial flavorings. While you'll want to use freshly grated rind as decoration on iced breads,cakes, and cupcakes, the dried rind is just as delicious as fresh rind when added as an ingredient to baked goods.

To make your own dried citrus rind:

  1. If possible, choose organic oranges or lemons, and thoroughly wash and dry the fruit.
  2. Carefully use a citrus grater to lightly grate off only the top layer of the skin. You want only the flavorful orange or yellow part of the peel. Avoid the white pith because it makes baked goods bitter.
  3. Transfer the grated peel to a flat dish or onto a piece of wax paper. Let the grated peel dry overnight, or longer if needed.
  4. The grated oranges and lemons can be juiced for baking or drinking, or you can store the fruits in a plastic bag and keep refrigerated until you are ready to use them.
  5. When the grated peel is completely dry and coarse, store it in a clean, glass jar. Keep out of sunlight to prevent fading.
  6. Crush the peel between your fingers before adding it to other ingredients so as to release the orange or lemon flavor. Use in the amounts called for in the recipe.
Putting the new
GE Immersion Blender to work today!!!!!
The reviews online do not have much to say about this product....I fine that if you use it on the low speed it works perfect for soups and shakes....all and all for the price I think this product works pretty well for light duty things. Walmart sells them for under $30.00....

Specs:

  • 250 watts Motor
  • Dual Hi/Low Speed Control
  • Stainless Steel Immersion Shaft
  • Whisk, Measuring Cup and Chopper Bowl Attachments
  • Storage Bag
  • Simplify food processing with the GE Immersion Blender. You can avoid the hassle of chopping, cutting, and whisking with this 2-speed hand blender that is a perfect addition to your other kitchen tools. In addition, the sleek design and finish are sure to complement your contemporary kitchen decor. This stainless steel immersion blender comes with a whisk, storage bag, measuring cup, and chopper board attachments for ease of use. It consumes very less space than a food processor or traditional blender. This stick immersion blender also has dual hi/low speed control that allows manual adjustments.

    How to peel and cut a butternut squash....

    How to Peel and Cut a Butternut Squash


    Keep squash pieces as stable as possible while cutting. A rubber mallet can help, if you have one, to gently push the knife through difficult thick spots. Using a very sharp vegetable peeler, one with a carbon steel blade, will help with the peeling.

    Ingredients

    • One butternut squash, 1 1/2 to 3 pounds
    • A sharp, heavy, chef's knife
    Method
    1 Using a heavy, sharpened chef's knife, cut off about 1/4-inch from the bottom of the squash in an even slice. Then cut off 1/4-inch from the stem end.


    2 Holding the squash in one hand, use a sharp vegetable peeler in the other hand to peel off the outer layer of the squash. You can also secure the squash standing upright and peel it in downward strokes with the peeler. Stand the peeled squash upright on a cutting board. It shouldn't wobble, you want the squash to be stable. (If it is wobbly, make another cut at the bottom to even it out.) Make one long cut, down the middle from the top to bottom, with a heavy chef's knife. Some squashes can be pretty hard; to help with the cutting you can use a rubber mallet to gently tap on the ends of the knife to help push the knife down through the squash.

    cut-butternut-7.jpg
    3 Use a metal spoon to scrape out the seeds and the stringy pulp from the squash cavity. (If you want, you can prepare the seeds like toasted pumpkin seeds.)
    cut-butternut-8.jpg
    4 Lay the squash halves, cut side down on the cutting board for stability. Working section at a time, cut the squash into slices, lengthwise, the desired width of your squash pieces. Some recipes call for 1/2-inch slices or cubes, some for 1-inch or greater.
     5 If you are cubing the squash, lay the slices down (you can stack a few at a time) and make another set of lengthwise cuts. Then make crosswise cuts to make cubes.
    One 1 1/2 pound butternut squash will yield approximately 4 cups of 1/2-inch cubed squash.

    Tuesday, March 6, 2012

    Homemade Croutons....garnish dishes for My Gardner Guy!!!

    Make Your Own Croutons

    Once you make your own you will see how much better tasting they are and how easy. I save left over buns, ends of breads, day old french bread, etc. and put them in the freezer. When I have collected enough I make a big batch...
    1. Cut some day-old or stale  bread into cubes.
    2. Drizzle the bread cubes with olive oil. Toss in a pan.
    3. Spice them up with a few shakes of Italian seasoning, garlic powder, or whatever spices sound good. Toss again. I have been enjoying using the spice salad supreme, and grounded up sun dried tomato's...
    4. Bake at 400° for 5 minutes. Shake and toss. Bake until toasted. ***Pay attention so you don’t burn them!
    That’s it!  Enjoy...............

    Georgie

    Thursday, March 1, 2012

    Meatloaf for my Gardner Guy

    I like making this meatloaf, but the seceret is having a nice meat loaf pan that allows the extra grease and juices to drain to the bottom of the pan, great tasting meatloaf....
    This one is made by kitchen aid...there is a lot of different brands on the market and they are not expensive, so try one it makes a big difference....


    My Gardner Guy's Meatloaf...

    2 teaspoons cooking oil
    1 green onion, minced
    2 cloves garlic, minced
    2 TBSP minced green bell pepper
    2 TBSP grated carrot
    2 eggs, beaten
    1 cup of milk
    2 teaspoons of salt
    1/2 teaspoon of ground black pepper
    1/2 teaspoon of garlic power
    1/2 teaspoon of onion power
    1 1/2 pounds of ground beef (ground chuck)
    3/4 pounds of ground pork or ground turkey
    1 cup bread crumbs (such as Progresso)
    1/2 cup all purpose flour
    1/4 cup ketchup plus an additional 1/4 cup for the top

    Heat oven to 350 degrees

    Saute green onion, garlic, green pepper, and carrot in cooking oil on a medium heat until slighty tender.
    Combine beaten eggs with milk, salt, black pepper, garlic powder, and onion power in a medium bowl.
    Mix bread crumbs and flour into your meat. Add eggs, milk, sauted vegetables, 1/4 cup of ketchup.
    Press the mixture into a meatloaf pan. Bake for 30 minutes, then spread remaining 1/4 cup of ketchup over the top of the meat loaf and bake for another 45 -60 minutes.

    Georgie


    Wednesday, February 22, 2012

    Challah Bread


     This is a good panini bread for smaller sandwichs, excellent for french toast....it is a large recipe so I half it...
     I got this recipe from my oldest daughter, all three of my kids have turned out to be pretty good cooks....it is fun to share recipes with them. This is going to bread that I will make often for My Gardner Guy....infact chicken panini's tonight and french toast this weekend...


    Challah Bread

    3 T. Yeast
    2 c. Warm water
    2/3 c. Sugar (or honey)
    1 T. Salt
    1/2 c. Canola oil
    7-8 c. Flour
    4-5 large eggs

    To a large mixing bowl, add water, yeast, sugar. Let sit for about 5 minutes. To that, add salt, half of the flour, and oil. Mix together. Add the eggs, mix to combine, then add the rest of the flour. Knead for a few minutes and determine whether you need more flour. The dough should be a little moist, but if it feels too moist, add more flour and continue kneading until it's no longer sticky. Cover and let it rise for about 1 hour.

    Punch down the dough, dump onto a floured surface, and divide dough into 2 pieces - set one piece aside. Divide each of the two pieces into three pieces and roll into snakes about 12-15" long. To start your braid: line the three pieces up on the counter, join them together, pinch, and tuck under - then braid. Finish by pinching and tucking the end of the braid just like you did at the top. Gently place your braided dough on a buttered cookie sheet. Cover with a light towel and let rise for another hour or until it's doubled in size.

    Repeat for the remaining piece of dough. Brush dough with egg wash - 1 egg mixed with a little water). Bake at 350 degrees until golden brown, about 15-18 minutes.

    Makes 2 large loaves.

     Have fun.....
     Georgie


    Tuesday, February 21, 2012

    Banana Nut Bread with a banana glaze.....tested, tested....recipe


    If you look on the internet you will fine plenty of banana bread recipes, over the years I have tried many, but I always went back to my favorite one. In the past three years I have started making a banana glaze to top this delicious treat...My Gardner Guy loves it. The best thing about this recipe is that it freezes well. In fact I have a few grandcritters who perfer eating it this way (partly frozen). This bread is good with and without the special banana glaze. My Gardner Guy has a very sweet tooth come 8:00 pm every evening....with the glaze it's more like a cake to him!!!

    Banana nut bread...

    1/2 cup butter (or 1/2  cup of mashed banana) See notes below...Health-conscious
    1 1/2 cups sugar
    2 eggs
    1 tsp vanilla
    1 tsp of baking soda disolved in 4 Tbsp of milk
    2 cups flour
    3 bananas (smashed)
    1/2 cup of nuts (optional)

    To start with add baking soda to milk set a side and smash up your ripe bananas. Cream butter and sugar, add eggs and vanilla. Add the flour, soda mixed with milk and bananas....mix well and last add the nuts of your choice. Walnuts and pecans work great as well as taste great in this bread. This recipe makes three small loaves or one large one. The baking time for the small loaves in arounf 45-50 minutes, I find when I do a large loave it takes longer to get the center completely done. Around 60-65 minutes. To keep bread from getting to dry or brown the last 15 mintues I cover the loaf with a sheet of tin foil.Bake at 350 degrees...

    Glaze

    1 cup powdered sugar
    3 tbsp. liquid (milk - water - fruit juice, etc.) I use milk
    1/4 cup of dried banana chips grounded (I use small coffee grinder)

    Mix all the ingredients and spread on warm bread......

    Health-conscious cooks know that applesauce, prunes, pumpkin puree and mashed bananas may substitute for all or some of the butter used in baking. If you're lucky enough to have a trusted low-fat cookbook that already has done the calculating for you, follow the recipes. But if you'd like to transform a beloved traditional recipe, you may need to experiment. Sources like MayoClinic.com suggest replacing about half of the butter or other fats with mashed banana, while some extension services claim that bananas may replace all of the butter with good results.
    Read more: http://www.livestrong.com/article/432982-how-to-replace-butter-with-banana-in-baking/#ixzz1n5Be0slw

    Drying your own banana tips...http://mygardnerguy.blogspot.com/2012/02/banana-chips-homemade-with-food.html

    Monday, February 20, 2012

    Dried Banana Chips...

    Banana Chips - Homemade With A Food Dehydrator Versus Store Bought....

    Once you dry these you will always want them in your pantry....it's easy, tasty and good for you.

    Homemade Banana Chips Are 100% Natural
    By Food-Dehydrator.com
    Banana chips are a great tasting, healthy snack that can be easily made with a food dehydrator. Banana chips’s basic ingredients should consist of:
    • ripe or slightly overripe fruit

    • if desired, lemon or lime juice (I never use)

    To make banana chips: Peel the bananas and cut them crosswise into about 1/4 inch thick chips. If desired, before dehydrating, you can dip the banana chips into lemon or lime juice to help prevent browning post drying. If the bananas are pretreated with citrus juice, make sure they are well drained and dried before placing them in the food dehydrator. Dry the banana chips at 130 degrees Fahrenheit for up to 8 to 10 hours. The chips should feel dry and leathery when done.
    Homemade banana chips are a wholesome, healthy, 100% fruit snack that are easy and fun to make. They are very sweet and have an intense banana flavor due to the food’s reduced water content which intensifies the fruit’s natural sugars.
    In contrast to homemade banana chips, store bought dried bananas are typically deep fried in unhealthy oils, like coconut or palm oils. These oils contain high amounts of saturated fats. Further store bought banana chips can be covered with additional sugars or honey. In fact, Self Nutrition Data lists a 3 ounce serving of fried banana chips as containing 44% of the daily recommended amount of fat and 123% of the daily recommended amount of saturated fat.
    To recap:
    Homemade banana chips – 100% fruit, 100% natural ingredients and sugars
    Store bought banana chips – Fruit, but also unhealthy saturated fats and added sugars
    Go with the real thing – home made banana chips made with your food dehydrator

    Friday, February 3, 2012

    Valentines for the Kids and Grandcritters....

    I usually shop the after Christmas sales as you can always find candy to use for Valentines for a reduced price...this year I found some Martha Stewart packaging and some cute chocolate bears. I did not find much in the candy department to use for Valentines but there is a lot of stuff out now that will work for what I am doing. I wanted to fill each one with bake goods from the kitchen but I have a daughter expecting grand critter #10 so I had to make other plans. With nine kids, five married couples and 9 grand critters our Valentines list gets long...I love them all. The chocolate bears ended up being 10 cents  each after Christmas....nice deal!!! The Martha Stewart boxes were half off, baked goods from the kitchen would of made these gifts more reasonable but like I said in order to help my daughter (traveling out of town) I ended up spending more buying commercial candy...oh well. They still turned out cute!


    Saturday, January 21, 2012

    My Gardner Guy's Cherry Cheese Pie......


    This has been a family favorite for years...and years...
    In the past and still at times I have use store bought cherry pie filling. Now that I have a cherry tree I use our cherries!!!

    Ingredients
    • 8 ounce pkg cream cheese, softened
    • 14 ounce can sweetened condensed milk
    • 1/3 cup lemon juice
    • 1 8 0z tub of cool whip or other whipped topping
    • 1 store bought graham cracker crust, or make your own... 
    • 1 Can of pie filling of your choice or if you have other pie filling use it.
    Instructions

    Place your softened cream cheese in a mixing bowl and add your sweetened condensed milk.


    Add in your lemon juice


    Mix well and allow to sit for around ten minutes before folding in cool whip


    After folding in cool whip put into pie crust


    Looking good!!!


    Cover and chill a few hours then add you favorite topping and serve...


    Taste as good as it looks!!!


  • TOPPING VARIATIONS


  • BLUEBERRY: Omit cherry pie filling. Combine 1/4 cup sugar and 1 tablespoon cornstarch in medium bowl; mix well. Add 1/2 cup water, 2 tablespoons lemon juice then 2 cup fresh or dry-pack frozen blueberries, thawed; mix well. Bring to a boil; reduce heat and simmer 3 minutes or until thick and clear. Cool 10 minutes, stirring constantly. Cool 15 minutes. Spread over pie. Chill thoroughly.
  • CRANBERRY: Omit cherry pie filling. Combine 1/3 cups sugar and 1 tablespoon cornstarch in medium saucepan. Add 1/2 cup plus 2 tablespoons cold water and 2 cups fresh or dry-pack frozen cranberries; mix well. Bring to a boil; reduce heat and simmer 10 minutes. Spread over pie. Chill thoroughly.
  • FRESH FRUIT: Omit cherry pie filling. Just before serving, arrange well-drained fresh strawberries, banana slices (dipped in lemon juice and well drained) and blueberries on top of chilled pie. Brush fruit with light corn syrup if desired.
  • AMBROSIA: Omit cherry pie filling. Combine 1/2 cup Smucker's® Peach or Apricot Preserves, 1/4 cup flaked coconut, 2 tablespoons orange juice and 2 teaspoons cornstarch in small saucepan; cook and stir until thickened. Remove from heat. Arrange fresh orange sections over top of pie; top with coconut mixture. Chill thoroughly.


  • Loving mashed potatoes the Irish Way!!!

    You can use kale instead of cabbage, but I personally prefer the softer and sweeter taste of cabbage. Colcannon is traditionally topped with...