Sunday, June 9, 2013

I have garden fairies with a sweet tooth.....


Fairies secret
 garden...
A trend in gardening that has been gaining popularity in the last few years or so is fairy gardening. If you look around sometimes they even offer classes on getting you started in this exciting new hobby. I mentioned fairy gardens in passing to a few friends and to my gardner guy recently and he had no idea what I was referring to, in fact he thought I was making it up. Even after I explained it, he didn't seem to get the point, but a lot of people have taken to this new trend and are looking at their gardens in a whole new way. My garden guy still rolls his eyes...my grandcritters are fascinated with playing and living in the land of fairies. Of course, Grandpa AKA  My Gardner Guy keeps telling the grandkids he is going to feed those garden fairies some cheese burgers so he can fatten them up and chase them with the lawn mower!!!

The basic idea of fairy gardening is gardening in miniature, creating the appearance that tiny fairy creatures have taken up residence in your garden. This is also a great chance for the children in your life, be they friends, grandchildren, or your own children, to be part of the process. I think that is what inspires my desire as I am excited to see how the grandcritters are going to react when they are introduced to the magical fairy land.

Like a lot of trends, you can spend a lot or a little in participating. You can find fairy houses and accessories  in many gardening catalogs and stores, often times with high price tags attached. I have taken a more economical approach by looking for items with fairy garden potential that are not labeled as such. I first started buy looking around my home...you will be surprised at what you can gather up. Consider items found in the toy department, home décor, or even odds and ends found in nature or in your garage or junk drawer in creating a space to welcome fairies.

What is the best place for a fairy garden? Most sources suggest it be slightly hidden, at the base of a tree or an out of the way corner of the garden to create an element of surprise and discovery for visitors to your garden. Incorporating small plants into the scene increases the feeling that the space is inhabited by tiny fairies. I have chosen my front door entry, created an area with pots and making use of a corner near the stairs...

Creating a fairy garden can be as big or as small a project as you'd like it to be. Here are some ideas to get you started:
  • No garden to make a fairy garden in? Use a container. Place it on your porch or deck to enjoy the tiny landscape. If you use houses or other accessories that can't take the elements, this makes it easy to move them indoors during inclement weather
  • Another idea for a portable fairy garden: use an old suitcase and plant one side with your garden, close up the garden when extra protection is needed.
  • Look at items with a child's eye, or better yet, work with your children or grandchildren to re- purpose items you already have. My young friend that lives next door has come up with amazing fairy houses just using items she finds outside plus what she discovers while sorting through odds and ends in my craft supplies.
  • Check the Christmas clearance items for fairy garden potential. Many of the items typically used for Christmas village scenes are perfect for fairy gardens at a fraction of the price.
  • Fairy gardens don't need to stay outside. Use small houseplants grouped in a container or terrarium as a backdrop for your fairy landscape.
A fairy garden is a chance to rediscover the fun and wonder of gardening. We all know we have a lot of outdoor chores in the garden at this time of year. I highly suggest you throw in some "just for fun" activities like building a fairy garden. You'll be glad you did.


Put a door on your tree trunk...

I have allowed the fairies to live on and around the front entry notice the small sunflower door in the corner of the stairs...
using a small trellis I attach to fairies homes
we call them the fairies condo
cute miniature furniture adds to the fun
As you can see our fairies love sweets
These cute fairies followed me home from the dollar store!!!
Another fairy dwelling using a saucer, moss, stones, mini tiles...the mushrooms I found at the nursery

Buy using walkway stones, rocks I gather, moss and miniature  children's doll toys
This picture allows you to see the sunflower door better
I told the grandcritters that the magical fairies use their power to make these dogs smaller so they could not chase the neighbors cats...
I have not done this...but I like it and I am making plans to make one
This is where the fairies go to renew their magical energy and powers 
Since I took this picture I have planted some seed awaiting it's growth, this is were the fairies come to learn
The wise  Mr. Owl teaches them to apply wisdom in their lives...
The birds teach them how to sing and warn them of any danger in the skies...
The snails teach them to be grounded in good values and warn them of any danger lurking on the grounds of our home
The turtles teach them to be consistent in all their duties
The frog teaches them to hop to it....get it done...work before play
And the hedge hog teaches them how to protect themselves....
I think these are sweet lessons for my grandchildren...AKA...grandcritters can learn ;)

This is Mr. Caterpillar

I think I want to add something like this to the fairy garden in the fall...

Friday, June 7, 2013

That pretty pumpkin makes more than pies!!!


Pumpkin jam .....it makes for a very nice gift for Christmas...
and it is not exactly something you'll find on your supermarket shelves, even in the fall season. What a shame because people are missing out on a delicious jam that can be enjoyed year round! It's absolutely delicious -- not too sweet, but perfect on virtually all types of breads and even in some desserts. Try it on bagels, muffins, pancakes, biscuits, toast and even use in place of mayo on a chicken or turkey sandwich! It's rather simple to make and almost foolproof. In my opinion, it tastes a lot like pumpkin pie! It's just perfect for the holidays! And that is just what I used it for, it was my 2012 christmas gift to many friends and neighbors (my friends are my neighbors)....it just took me this long to get it posted for all to enjoy why.... well life...computer mishaps and timing!!!

Prep Time: 5 minutes

Cook Time: 1 hour

Total Time: 1 hour, 5 minutes (recipe below)

My Gardner Guy grows them and the grandcritters love them!!!

  I enjoy all  the pumpkins that my Gardner guy brings me. ...every year my house looks festive!!!
Starting with Halloween...then we move into Thanksgiving...

We grow all different kinds and it matters not to me which ones I use to cook with as I  have cooked them all!!!
They make a wonderful table display for Thanksgiving...oh but where do you put the food right!!!


When the holiday's are over I gather them up and slice them in half,  I then save me some seeds for  my gardner guy to replant next year...and roast some!!!
Then I  bake them face down until the outer layer is not firm.... when it is done you can scoop the pumpkin out easy as it separates itself from the outer skin very nicely
Puree it in a food processor  and you now have your own pumpkin....
it freezes well... The good thing about freezing it is it is there when you want to use it later...


Now onto the pumpkin jam......

Ingredients:

  • 1 29 ounce can of pumpkin puree or pumpkins you cooked yourself....
  • 1/2 teaspoon clove
  • 1/2 teaspoon cinnamon
  • 1/4 teaspoon ginger
  • 1/4 teaspoon allspice
  • 1 1/2 cup granulated white sugar
  • 3 tablespoons lemon juice
  • 1 teaspoon of vanilla extract

Preparation:

In a medium saucepan, combine all ingredients on medium-high heat, stirring constantly. Bring to a boil and reduce heat to low. Allow mixture to simmer for about 45 to 60 minutes. Check frequently to prevent sticking at the bottom of the pan. If this occurs, lower heat further. When making jams and jellies, I like to use a non-stick pan instead of stainless steel or copper bottom pans. After 45-60 minutes, the mixture will be thick and a clear orange color -- almost translucent. Place in sterilized jars and seal once cooled. You can also place in unsterilized containers, but the jam will only be good for a week or two in the refrigerator. If you are a first time canner, it is important that you follow canning safety procedures very carefully. If not, you may put yourself or others at risk of food poisoning and also risking premature spoilage -- you don't want all of your hard work to be for nothing!


For more information about canning and canning safety, please read this canning safety resource from About.com Home Cooking.

In the mood for Pesto again...

My supply of basil this year in the garden is not much....I am a little disappointed as I love pesto with basil it is my favorite. I have learned over the past few garden seasons sometimes what grows good one year in one spot when you rotate your plantings it might not to so good the next time. That is were we are this year...it is planted between our grow and pumpkins and both have crowded the basil out. So, I am using my radish greens....yes you can use other greens to make pesto.

Yet another couple of pesto recipes with variety worth the try....


Sicilian Nut Pesto

Source: based on a recipe in Erica DeMane's The Flavors of Southern Italy
Yield: about 2 cups
Notes: I was blown away by the complex flavors in this multi-nut pesto from Sicily. Although I briefly considered dropping the mint, thinking it would overpower some of the other flavors, I was so glad I didn't - the mint adds an underlying note of freshness to the basil that beautifully compliments the rich profusion of nuts. Also note that there are versions of this pesto that contain cheese, but you can make it without as the variety of nuts added make it a rich tasty pesto without.

1/2 cup shelled, unsalted pistachios
1/2 cup blanched almonds
1/2 cup hazelnuts
1/4 cup pine nuts
2 plump cloves garlic, coarsely chopped
1 cup (packed) basil leaves, chopped or torn
2/3 cup (packed) mint leaves, chopped or torn
about 1/2 cup extra-virgin olive oil
salt, to taste 


Preheat the oven to 350F/180C. Begin by toasting the nuts in separate batches on a baking sheet just until golden and fragrant, about 10-12 minutes for the almonds and hazelnuts, and 7-9 minutes for the pistachios and pine nuts. (If you think you'll be vigilant enough, you can stick them all in the oven together in different pans, removing each kind of nut as it turns golden.) Set them all aside to cool. Using a towel or moistened hands, rub the skins off the hazelnuts. Combine everything in a food processor (or a mortar and pestle, if you like things done the old-fashioned way) and pulse until reduced to a slightly chunky paste, adding more oil if necessary.  Taste for salt, then store in a covered container in the refrigerator for up to a week. You can use this as a sauce for pasta, or as a topping for fish, chicken, vegetables, or foccacia. It also makes a awesome sandwich spread, layer a grill cheese sans wish with this add some white cheddar and you have a gourmet treat...

Pesto Rosso
Source: adapted from Patricia Wells' Trattoria
Yield: about 2 cups 
Notes: While the above pesto is fragrant, herbal and fresh, this one is gutsy, punchy and robust. It goes well with just about everything, including stronger flavors like red meat and pork. When I use it for pasta, I have no qualms about showering this one with copious amounts of cheese.

10 whole sundried tomatoes, packed in oil
4 cloves garlic
about 20 oil-cured black olives, pitted
1/2 cup blanched almonds, lightly toasted and chopped
2 tablespoons (packed) fresh rosemary, coarsely chopped
2 teaspoons sugar
1 small dried hot chili, or 1/4 teaspoon cayenne pepper
1/3 cup extra-virgin olive oil
2 teaspoons balsamic vinegar


Combine everything in a food processor fitted with a metal blade and pulse lightly until a chunky paste is formed. Taste for seasoning, correcting the balance of salt, sugar or vinegar if needed. Keeps covered for at least a week. See above recipe for serving suggestions.

I love pesto check out my collections.....I have use many other greens to create great tasting pesto's....follow this link for some pesto recipes...


Garden Peas makes a great tasting pesto....

It's about time...


Here I am....computer back and running, camera finally located after it was taken home by accident to Shelley's. I'm back and it feels good but I have so much to write about.

We had a long winter with way to much snow to get excited about...now the summer is upon us... it is not to hot in Utah but I am visiting the grandcritters in Las Vegas and we are having a severe heat wave....106 and tomorrow highs up to 112.

To hot in my opinion...thankful for a pool to cool off in!!!

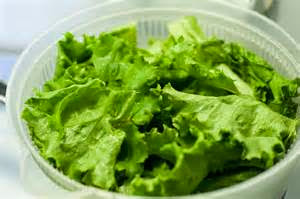
 I can still enjoy the greens I brought with me...cool refreshing salad and the winter blues have added to many inches to my figure so I plan on upping the vegetable intake. Growing Lettuce is easy...the rewards are great because it produces a lot and grow quickly...Today I cleaning the leaf lettuce my gardner guy picked for me...

 Unlike head lettuce, leaf lettuce grows in leaves and does not form a head. The form of the leaves varies depending on the variety of leaf lettuce harvest you have planted, and the color varies as well.

Leaf lettuce is the easiest of lettuces to grow, and because of this you could end up with a great leaf lettuce harvest your first season planting it. Another positive tip is leaf lettuce grows quickly, you can plant it throughout the growing season and be harvesting leaf lettuce all growing season long.

We are on our third cutting and it is only the first of June. For lettuce through out your garden season all you need to do is stagger your plantings and harvest your garden leaf lettuce as the leaves reach maturity.


 How to Harvest Leaf Lettuce... 

 Harvesting leaf lettuce is quite simple. Are you having salad for dinner? Walk out to the garden and pick the leaves that are mature.

When you think about how to pick leaf lettuce, just remember that you don’t want to uproot the whole plant. This will cause the rest of the plant to die off.

Be gentle, and quickly snap off each mature leaf leaving behind those that are not yet ready so they can grow bigger for another day.

Make sure you know how to harvest leaf lettuce so that your garden doesn’t become overgrown with large, overly ripened leaf lettuce. If this happens, these leaves are not really usable because they get tough and bitter.

If you enjoy salads, leaf lettuce is a great garden staple.

When cleaning your lettuce I rinse it off well and then use a salad spinner to remove as much water as possible. This really does help preserve the life of your lettuce...

Additionally, it prevents the leaves from becoming soggy. Spinning the leaves also works faster than drying the lettuce by hand.

Read more: What is the Purpose of a Salad Spinner? | eHow http://www.ehow.com/facts_6961482_purpose-salad-spinner_.html#ixzz2VYP0p7eJ

Loving mashed potatoes the Irish Way!!!

You can use kale instead of cabbage, but I personally prefer the softer and sweeter taste of cabbage. Colcannon is traditionally topped with...